VIM for IDE-people - part 3
File system explorer: NERDTree
When working with an IDE, you usually have a way of browsing your local filesystem to choose a file to edit. There’s not such standard functionality built-in into Vim. Luckily there’s The NERD Tree.
NERDTree allows you to browse your file system, open files an directories, and allows simple file operations like creating files/directories, moving them, deleting them, copying them. Everything is presented the way you’re used to: a tree. Hence the name.
Installation
Installation is quite easy with Pathogen, which we installed in Part 1:
cd ~/.vim/bundle
git clone https://github.com/scrooloose/nerdtree.git
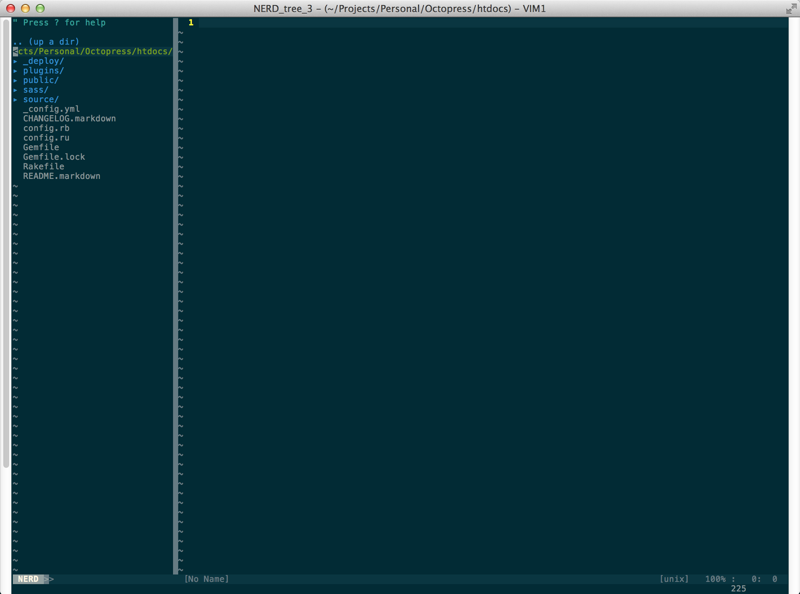
Then reload Vim, and NERDTree is available. Display the NERDTree with :NERDTree. This will show you a tree of your filesystem, starting from your current working directory.

Basic commands
When the NERDTree window is active, you can find all available commands by pressing ?. This displays the help. Close the help by pressing ? again. Below is an overview of commands I’m currently using most:
Opening/Closing NERDTree
Just opening NERDTree with the current working directory as root, type :NERDTree.
If you want to open NERDTree with a specific folder as root, type :NERDTree /path/to/folder.
Working with a big screen gives you the option to always have NERDTree open. When your screen real estate is smaller, you can toggle the NERDTree window with :NERDTreeToggle. If you know how to bind a command to a specific key combination, then you can easily switch NERDTree on or off.
Navigation
You can use the regular Vim navigation keys to move around in the tree. With me not being used to the Vim navigation keys, I tend to use the arrow keys. Yes, I know…
Folders
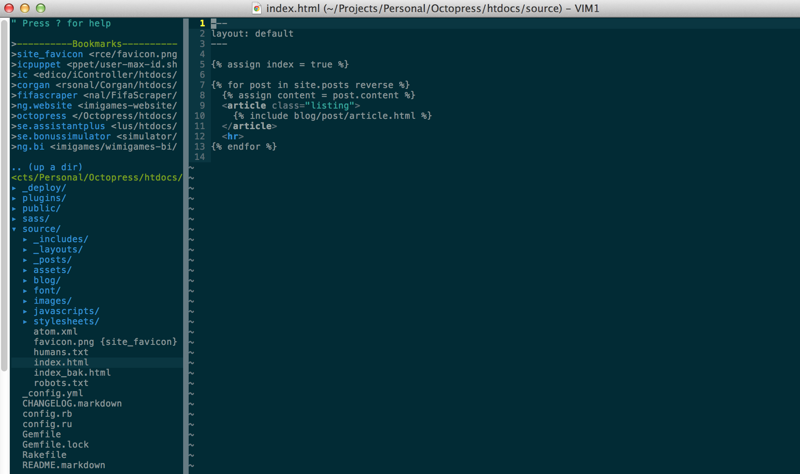
Folders are marked with a triangle in front of them. To open a folder, move to the corresponding line, and press enter. Closing a folder is the same key.
When your cursor is on a file in a folder and you press x, the parent folder closes, placing your cursor on the line of the folder. Repeating x then closes the folder’s parent, and so on.
If your cursor is on a folder, and you want to close all subfolders recursively, hit X (capital x).
Files
After browsing your filesystem, the next thing you’re probably going to is edit a file. To open a file in the last active window, navigate to the correspondig line in the NERDTree panel, and hit enter.
Want to open the file in a new vertical split window? Hit s.
If you’re more of a horizontal split kind of person, hit i to open the file in a new horizontal split.
And finally, if you prefer opening the file in a new tab, hit t.
Using one of these methods above will open the file in your prefered split/tab, and immediately focus in the new split or tab. If you want to just open the file, but keep on navigating your filesystem, you can prefix the split commands with g: gs, gi. This is called a “preview split”. You can do the same with tabs, but then you’d hit T.
Filesystem manipulations
With the NERDTree window active, press m. A menu appears with a list of manipulations available, such as creating a file/folder, moving a file/folder, …
The most important thing to remember is: When you’re creating a folder (m followed by a), don’t forget to add a trailing / to the folder name. If you forget, a file with that name will be created instead of a folder.

Bookmarks
One of the features I like most, is the ability to create bookmarks in your filesystem. A bookmark simply allows you to create a tag for a specific location in NERDTree. Once you have created a bookmark, you can use :NERDTree <bookmark> to have the tree open at this specific location.
Creating a bookmark: Put your cursor on the file or folder you want to bookmark, and type :Bookmark <your bookmark name>
Toggle the bookmark table: B

Delete bookmark: Go to the corresponding line in the bookmark table and hit D.
Final words
NERDTree makes it very easy to browse your filesystem. It should be one of the first plugins you install. Especiall if you come from an IDE, like me, it makes sense to have something available that you know from your IDE world.
One last tip before closing this post: If you’re tired of having to toggle NERDTree each time you fire up Vim, you can have it auto-opened for you. Just put the following in your ~/.vimrc, reload Vim, and it’s there! Beware: it can be annoying if you open Vim in the terminal. Mostly you’re just editing one file, so then the NERDTree window is a bit useless.
1
| |
Vim For IDE-people
This article is part of the series “Vim For IDE-people”. The other articles in the list are: